
Baremetal RISC-V

budding
Published: 2022-06-09
Last Edited: 2022-06-09
After re-watching suckerpinch’s “Reverse Emulation” video I got inspired to try and replicate what he did, but instead do it on an N64. Now my idea here is not to preform reverse emulation on the N64 itself but instead to use the SBC as a cheap way to make a dev focused flash cart. Seeing that sukerpinch was able to meet the timings of the NES bus made me think it might be possible to meet the N64 bus timings taking an approach similar to his.
Why RISC-V Baremetal?
The answer here is more utilitarian then idealistic, I originally wanted to use a Raspberry Pi since I thought that board may be more accessible if other people want to try and replicate this project. Instead what I found is that it is impossible to procure a Raspberry Pi. Not to be deterred I purchased a “Allwinner Nezha” a while back and its just been collecting dust in my storage. I figured this would be a good project to test the board out on since it has a large amount of RAM (1GB on my board), a fast processor (1 GHz), and accessible GPIO. As for why baremetal? Well one of the big problems suckerpinch ran into was being interrupted by the Linux kernel while his software was running. The board was fast enough to respond to the bus timings but Linux would throw off those timings with preemption. This is why I’m taking the approach to do everything baremetal. Giving 100% of the CPU time to my program emulating the CPU bus.
RISC-V Baremetal Development
Below I’ll document how I got a baremetal program running on the Nezha board, to provide guidance to anyone who wants to try doing something like this themselves.
Toolchain Setup
In order to do any RISC-V development we will need to setup a RISC-V
toolchain that isn’t tied to a specific OS like linux. Thankfully the
RISC-V org set up a simple to use git repo that has a script to build an
entire RISC-V toolchain on your machine. Since you’re building the whole
toolchain from source this will take some time on my machine (Ryzen
4500u, 16GB of RAM, 1TB PCIe NVMe storage), it took around ~30 minutes
to build the whole tool chain. You can find the repo here, and
follow the instructions in the Installation (Newlib)
section of the README. That will setup a bare bones OS independent
toolchain that can use newlib for the cstdlib (not that I am currently
using it in my software).
Setting up a Program
This is probably one of the more complicated steps in baremetal
programming as this will involve setting up a linker script, which can
sometimes feel like an act of black magic to get right. I’ll try to walk
through some linker script basics to show how I setup mine. The linker
script linker.ld I’m using is below
SECTIONS
{
    . = 0x45000000;
    .text : {
        PROVIDE(__text_start = .);
        *(.text.start)
        *(.text*)
        . = ALIGN(4096);
        PROVIDE(__text_end = .);
    }
    .data : {
        PROVIDE(__data_start = .);
        . = ALIGN(16);
        *(.rodata*);
        *(.data .data.*)
        PROVIDE(__data_end = .);
    }
    . += 1024;
    PROVIDE(__stack_start = .);
    . = ALIGN(16);
    . += 4096;
    PROVIDE(__stack_end = .);

    /DISCARD/ :
    {
        *(.riscv.attributes);
        *(.comment);
    }
}
The purpose of a linkscript is to describe how our binary will be organized, the script I wrote will do the follow
- Start the starting address offset to
0x45000000, This is the address we are going to load the binary into memory, so any pointers in the program will need to be offset from this address - start the binary off with the
.textsection which will contain the executable code, in the text section we want the code for.text.startto come first. this is the code that implements the “C runtime”. That is this is the code with the_startfunction that will setup the stack pointer and call into the Cmainfunction. After that we will place the text for all the other functions in our binary. We keep this section aligned to4096bytes, and thePROVIDEfunctions creates a symbol with a pointer to that location in memory. We won’t use the text start and end pointers in our program but it can be useful if you want to know stuff about your binary at runtime of your program - Next is the
.datasection that has all the data for our program. Here you can see I also added therodataor read only section to the data section. The reason I did this is because I’m not going to bother with properly implementing read only data. We also keep the data aligned to 16 bytes to ensure that every memory access will be aligned for a 64bit RISCV memory access. - The last “section” is not a real section but some extra padding at the end to reserve the stack. Here I am reserving 4096 (4Kb) for the stack of my program.
- Lastly I’m going to discard a few sections that GCC will compile into the binary that I don’t need at all.
Now this probably isn’t the best way to write a linker script. For
example the stack is just kind of a hack in it, and I don’t implement
the .bss section for zero initialized data.
With this linker script we can now setup a basic program, we can use
the code presented below as the main.c file
#include <stdint.h>

#define UART0_BASE 0x02500000
#define UART0_DATA_REG (UART0_BASE + 0x0000)
#define UART0_USR (UART0_BASE + 0x007c)

#define write_reg(r, v) write_reg_handler((volatile uint32_t*)(r), (v))
void write_reg_handler(volatile uint32_t *reg, const uint32_t value)
{
    reg[0] = value;
}

#define read_reg(r) read_reg_handler((volatile uint32_t*)(r))
uint32_t read_reg_handler(volatile uint32_t *reg)
{
    return reg[0];
}

void _putchar(char c)
{
    while((read_reg(UART0_USR) & 0b10) == 0)
    {
        asm("nop");
    }

    write_reg(UART0_DATA_REG, c);
}

const char *hello_world = "Hello World!\r\n";

int main()
{
    for(const char *c = hello_world; c[0] != '\0'; c++)
    {
        _putchar(c);
    }
}
This program will write the string “Hello World!” to the serial port.
Now a common question for code like this is how did I know to set all
the UART0 registers? Well the way to find this information
is to look at the datasheet, programmer’s manual, or user manual for the
chip you are using. In this case we are using an Allwinner D1 and we can
find the user manual with all the registers on the linux-sunxi page here. On pages 900 to 940 we can
see a description on how the serial works for this SoC. I also looked at
the schematic here,
to see that the serial port we have is wired to UART0 on
the SoC. From here we are relying on uboot to boot the board which will
setup the serial port for us, which means we can just write to the UART
data register to start printing content to the console.
We will also need need to setup a basic assembly program to setup the
stack and call our main function. Below you can see my example called
start.S
.section .text.start
    .global _start
_start:
    la sp, __stack_start
    j main
This assembly file just creates a section called
.text.start and a global symbol for a function called
_start which will be the first function our program
executes. All this assembly file does is setup the stack pointer
register sp to with the address (using the load address
la pseudo instruction) to the stack we setup in the linker
script, and then call the main function by jumping directly to it.
Building the Program
Building the program is pretty straight forward, we need to tell gcc to build the two source files without including the c standard library, and then to link the binary using our linker script. we can do this with the following command
riscv64-unknown-elf-gcc march=rv64g --std=gnu99 -msmall-data-limit=0 -c main.c
riscv64-unknown-elf-gcc march=rv64g --std=gnu99 -msmall-data-limit=0 -c start.S
riscv64-unknown-elf-gcc march=rv64g -march=rv64g -ffreestanding -nostdlib -msmall-data-limit=0 -T linker.ld start.o main.o -o app.elf
riscv64-unknown-elf-objcopy -O binary app.elf app.bin
This will build our source files into .o files first,
then combine those .o files into a .elf file,
finally converting the .elf into a raw binary file where we
use the .bin extension. We need a raw binary file as we
want to just load our program into memory and begin executing. If we
load the .elf file it will have the elf header and other
extra data that is not executable in it. In order to run a
.elf file we would need an elf loader, which goes beyond
the scope of this example.
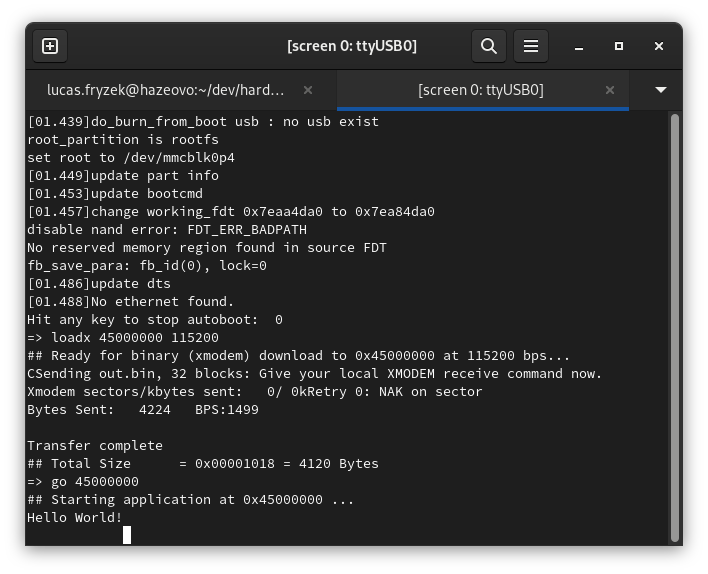
Running the Program
Now we have the raw binary its time to try and load it. I found that
the uboot configuration that comes with the board has pretty limited
support for loading binaries. So we are going to take advantage of the
loadx command to load the binary over serial. In the uboot
terminal we are going to run the command:
loadx 45000000Now the next steps will depend on which serial terminal you are
using. We want to use the XMODEM protocol to load the
binary. In the serial terminal I am using gnu screen you
can execute arbitrary programs and send their output to the serial
terminal. You can do this by hitting the key combination “CTRL-A + :”
and then typing in exec !! sx app.bin. This will send the
binary to the serial terminal using the XMODEM protocol. If you are not
using GNU screen look up instructions for how to send an XMODEM binary.
Now that the binary is loaded we can type in
go 45000000The should start to execute the program and you should see
Hello World! printed to the console!
What’s Next?
Well the sky is the limit! We have a method to load and run a program that can do anything on the Nezha board now. Looking through the datasheet we can see how to access the GPIO on the board to blink an LED. If you’re really ambitious you could try getting ethernet or USB working in a baremetal environment. I am going to continue on my goal of emulating the N64 cartridge bus which will require me to get GPIO working as well as interrupts on the GPIO lines. If you want to see the current progress of my work you can check it out on github here.